You are currently browsing the tag archive for the ‘Yorkshire Pudding’ tag.
After a brief medically (and Olympically) induced hiatus, I am back and feeling blogerrific! I am marking my return with a classic, yet slightly modified, recipe after having scoured the internet trying to find a blueberry popover recipe and discovering weird things like large pseudo-popover cakes cut into wedges and other things with a lot of sugar that look like muffins – none of which, in my book, constitutes a popover.
A popover is basically an easier-to-make cousin of Yorkshire Pudding. And when I say easier-to-make, what I mean is, if you will recall from my post on the YP topic, you don’t need to fill your tins with scalding hot fat. No sirree. You can just grease them like you would for muffins. Far less risk of hot fat induced burns, or splattering fat spraying around in your oven causing a smoky cloud to erupt when you finally open the door and pollute your house with the stench of burning oil for days and days and days and da … but I digress.
After my lengthy and largely unsuccessful google search for a recipe for blueberry popover that was, in fact, a popover, I remembered that I have a whole giant cupboard of cookbooks in my house. Within 1 minute of perusing my beautiful library, I determined that the best route to go would be to make a classic popover recipe and add blueberries. So that is what I did.
I used the recipe from Bernard Clayton Jr.’s “The Complete Book of Breads” (Simon & Schuster, New York, ©1973). The book was written the year I was born, so it must be good (crap, I think I just told y’all how old I am). Here’s the link to the New and Improved version which I’ve never seen and can’t vouch for. I really couldn’t improve on this recipe except that I had to modify it slightly by adding blueberries (to be true to the National Blueberry Popover Day) and to slightly increase the flour to adjust for the liquid from the berries. The popovers were light and moist in texture, not too sweet and the blueberries were a really lovely addition. I include Clayton Jr.’s writeup on popovers ’cause I can’t say it any better:
POPOVERS [a dozen or so]
Popovers are unpredictable. Popovers are good to eat. There isn’t very much to a popover. It is an ungainly-looking device for getting butter, jams, jellies and honey into the mouth. The popover owes it all to steam levitation. It is done without yeast or chemicals of any kind. Only steam raises it high, and then drops it into a clumsy shape. Popovers are good to eat. There should be at least one popover recipe in every home baker’s repertoire. This is a good one.
1 c. all-purpose flour (sift before measuring) [If making blueberry popovers, add 1/6 – 1/4 extra flour]
1/4 tsp. salt
1 tbsp. sugar
1 tbsp. melted butter or salad oil
1 cup milk, room temperature
2 large eggs
[1 c. blueberries]
Preheat oven to 400°. Mix flour in a bowl with salt and sugar. Add butter or oil, milk and eggs, and beat … until very smooth [Ed. note: a lot of notes here about using blender, electric-mixer, etc. I just used my trustworthy and much-loved whisk.]
Fill well-greased cups [either muffin tins, popover tins, custard cups, etc.] half full with batter. [Sprinkle each one liberally with fresh blueberries.] 
Bake in 400° oven 40 mins. for a dark brown shell with a moist interior. Bake in 375° oven 50-55 mins. for a light popover with a drier inside. Keep door of oven closed during the bake period to prevent a collapse under a draft of cold air. [I went with the 400° option with good results].
Remove popovers from the oven. Turn from the pans and serve hot. Prick the popovers with a skewer if you like a dry interior. Leave them in the turned-off oven, door slightly ajar, for 8 to 10 minutes.
Bon appetit 🙂
B
p.s. We had B.L.T.s for dinner and here’s a picture for the shameless bacon-eaters!
[Eds: This post is brought to you by Deb in her debut blog. See her bio in our Guest Bloggers section!]
The first time I made buttercrunch it was by accident. I was 12 years old and trying to make chewy toffee. Have you ever tried to make Yorkshire pudding? Or a soufflé? In all three cases the aspiring chef faces trials by fire such as split-second timing and crucial temperature measurement, and I was not up to the task.
I tried twice – once I got buttercrunch; the other an interesting white crystalline formation that bonded with my mother’s pot so firmly that we had to throw the whole misshapen tragedy away. Deterred, I eschewed confectionery creation (confecting?), and chewed bought toffee instead.
The Persians have it firmly figured out, you know. A delightfully generous neighbour of mine makes a buttercrunch-like sweet from Iran called Sohan. A pistachio brittle traditionally made in the holy city of Qom – Sohan was, in my opinion, the most delicious food in existence. Until recently…
I came across the real thing this Christmas at Vancouver’s Circlecraft craft market, where a company called Milsean was handing out buttercrunch samples. I was instantly hooked. It’s just plain irresponsible giving out stuff that delicious. With limited time and money, I couldn’t stand there eating freebies for hours, nor would they have let me, damn temptresses. And giving them every last cent I had would have rendered me Scrooge-like to my loved ones, gift-wise. So I bought a party pack and left before they cut me off.
My conclusion? It’s not crunch; it’s crack. Consider yourself warned… I’m not selling it, and I take no responsibility for what may happen if you read this post.
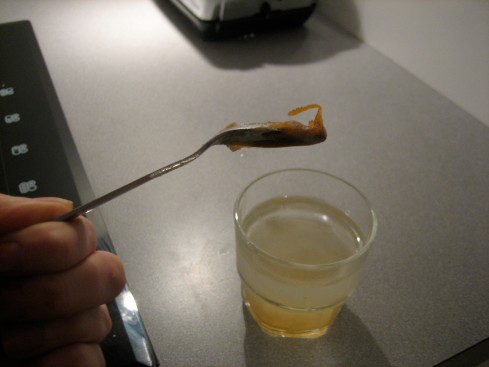
There are two things you need for making buttercrunch that you may not have handy – a candy thermometer, and, if you like a little savoury with your sweet, some of that lovely French sea salt, Fleur de Sel. If you don’t have the thermometer (I don’t!), there is a more folksy – read dangerous – way to tell if your candy is ready: the cold water test. This is way fun and kind of like a science experiment but with the promise of something yummy tasting at the end of it to cheer you up while the third degree burns heal. If you choose this method, the syrup needs to get to what they call “hard crack” stage, which means it hardens instantly into brittle threads when dropped into cold water.
Most buttercrunch recipes seem to call for corn syrup, but as that’s synonymous with Twinkies where I come from (no doubt there are many readers with great corn syrup recipes that crush this POV!) I chose a recipe on a Paris-based food blog by David Lebowitz that solves the problem European-style:
2 cups (8 ounces, 225 g) toasted almonds or hazelnuts, chopped
2 tablespoons water1/2 cup (1 stick, 115 g) salted or unsalted butter, cut into pieces
a nice, big pinch of salt
1 cup (200 g) granulated sugar
1/4 cup (60 g) packed light brown sugar
1/4 teaspoon baking soda
1 teaspoon vanilla extract
5 ounces (140 g) bittersweet or semisweet chocolate, chopped, or 1 cup chocolate chips
Fleur de sel
Call me crazy but I don’t want the chocolate on it – I just like the butter and the crunch, thank you very much (I know, I know – I can hear the shrieks of shock and protest echoing around cyberspace already). So I left that bit out of the instructions below when I made it.
- Lightly oil a baking sheet with an unflavored vegetable oil.
- Sprinkle half the nuts into a rectangle about 8″ x 10″ (20 x 25 cm) on the baking sheet.
- In a medium heavy-duty saucepan fitted with a candy thermometer, heat the water, butter, salt, and both sugars. Cook, stirring as little as possible, until the thermometer reads 300 F degrees. Have the vanilla and baking soda handy.

- Immediately remove from heat and stir in the baking soda and vanilla.
- Quickly pour the mixture over the nuts on the baking sheet. Try to pour the mixture so it forms a relatively even layer. (If necessary, gently but quickly spread with a spatula, but don’t overwork it.)
- Strew the chocolate pieces over the top and let stand 2 minutes, then spread in an even layer.
- If using, sprinkle with a small handful of cocoa nibs and a flurry of fleur de sel. Sprinkle the remaining nuts over the chocolate and gently press them in with your hands.
- Cool completely and break into pieces to serve. Store in an airtight container, for up to ten days.
This is David’s:
Yeah well… Either way – yummmmm!!! Thirty-two years after my first accidental encounter with buttercrunch, I’m making it on purpose. Now why didn’t I think of that before? Enjoy!
~ Deb

Oops, I took a bite out of it before putting the gravy on it!
Because what you need right after Thanksgiving is a big ol’ roast beef and pastry roasted in fat. Of course, we are celebrating American National Food Holidays because, sad to say, it seems that Canadians just aren’t as inspired by food as our friends to the south (trust me, I looked – we got nothin’). So their turkey day isn’t for another month and in that context, it makes perfect sense to have roast beast and pudding as the days grow shorter and colder and we all start to get a yen for comfort food. Incidentally, the Brits, who originated this delectable delicacy, (duhhhh … Yorkshire!) have their Yorkshire Pudding Day, more sensibly if you ask me, on February 1st.
It’s an incredibly versatile pastry, serving equally well as a conduit for gravy (their primary purpose), a musical inspiration and a marine transport. Really, it’s a British icon traditionally served with Roast Beast.
The basic premise is that you heat a pan with some fat in it (using a hot oven), throw some sloppy, runny batter into the pan, toss it back in the oven and wait for a bit. You can find out all about that here. I didn’t use that recipe though. I used the one from the Boston Globe cookbook ’cause it looked simpler but I couldn’t find an online version so you can look it up if you’re really that keen. My roast beef wasn’t done roasting yet ’cause I was busy making jambalaya in my new copper pot that I got for an early birthday present and that was the number one priority, so I didn’t have drippings from the roast, but what I did have was the fat I had skimmed off my ham stock that I had thawed out to use in the jambalaya, so I used that in the pan for the yorkshire puddings. Looked disgusting, but I was sure it would turn out great and it did.

Hog fat in a muffin tin

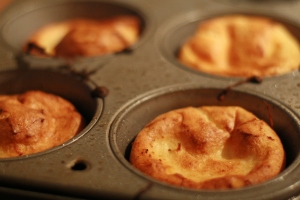
They were really big muffin tins, but I'll admit, the puddin's didn't rise spectacularly well
Ate my yorkshire pudding on the side of my jambalaya in the company of P and D and a nice Chianti. May have, as it turns out, been too much starch for me. In any event, then I made gravy with the drippings of the (sadly overdone) roast beef (this is what happens when you have to go put a baby to bed in the middle of making two dinners at the same time) which I made better by adding lots of red wine and shitake and chantrelle mushrooms. It was a really pretty gravy.

Real Brown Gravy - the chunks are delicious mushroomy bits
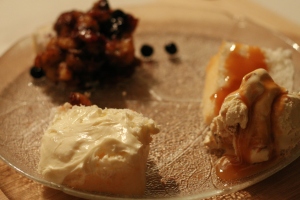
Right now P is re-creating Angel Food Cake day with a trio of toppings for the leftover cake. This blog is going to be really bad for our diets!

Clockwise from top: My brown butter banana rum sauce w/blueberries, with praline ice cream, and with (yech!) vanilla icing out of a tin.
‘Til next time 🙂
B.


